
Precautions for use
Kongsi
Frequently Asked Questions and Solutions
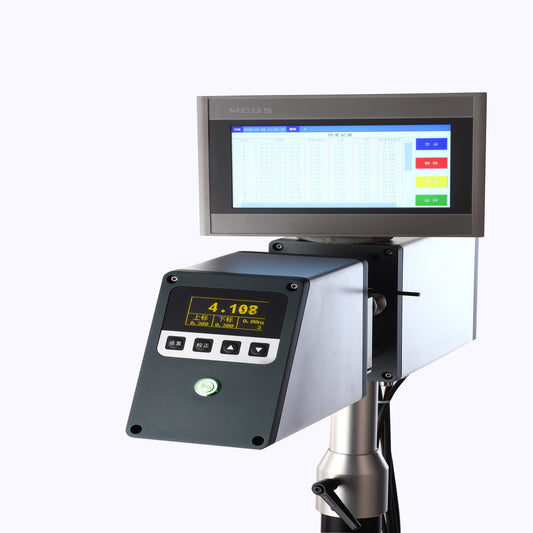
Laser Diameter Measuring Instrument
Device Won't Turn On: Check if the battery is installed correctly and ensure the battery has sufficient power. If the device still won't turn on, please contact after-sales service.
Inaccurate Distance Measurement: First, confirm whether the device has been calibrated and whether there are any reflections in the surrounding environment that may affect measurement accuracy. You can try re-measuring or recalibrating the device.
Device Displays Error Codes: Refer to the error code table in the device manual to understand the specific cause of the error and handle it accordingly. If the issue cannot be resolved, seek professional technical support.
Bluetooth Connection Issues: Ensure the device's Bluetooth is turned on and try reconnecting. If the problem persists, try updating the device's software or contact technical support.
Common Troubleshooting
Issue 1: The measuring head or display control unit shows no display, and the indicator light is off.
Solution: Check the power connector, power switch, and fuse. If there are no issues, the power circuit may be damaged. Please contact the manufacturer.
Issue 2: The measuring head display does not light up.
Solution: Turn off the power and then turn it back on. If it still doesn't work, the scanning motor or drive circuit may be faulty. Please contact the manufacturer.
Issue 3: The display digits are normal, but the buttons do not respond.
Solution: The keypad plug may be loose. Reinsert it.
Issue 4: The measuring head does not display the outer diameter reading.
Solution: The protective glass on the measuring head may be dirty. Wipe off the dust. If the issue persists, recalibrate the device as described in Section IV.
Issue 5: The display control unit does not show the correct outer diameter reading.
Solution: If the measuring head readings are accurate, correct the display as described in Section IV, "Calibration."
Maintenance and Usage Precautions
1.When the measuring head is installed in front of the sink, smoke generally does not affect measurements under normal conditions. However, smoke may cause the transparent glass to yellow. Clean it promptly using alcohol or a non-corrosive cleaner.
2.When the measuring head is installed after the sink, use a blower to dry the measured object and prevent water from entering the instrument and contaminating the transparent glass.
3.Various parameters in the instrument directly affect its normal operation. Unauthorized personnel should not modify them.
4.If faults cannot be resolved during use, contact the manufacturer promptly.
Spark Machine
Device Won't Start: Check if the power is on and if the cable connections are secure.
Poor Machining Accuracy: This may be due to incorrect parameter settings. Adjust the parameters and check if the workpiece material meets the requirements.
Excessive Noise or Abnormal Vibration: Check if mechanical parts are loose or worn. Tighten or replace them as needed.
Machining Interruption: Check if the distance between the electrode and the workpiece is appropriate and if the working fluid is sufficient.
High Voltage Fails to Detect Pinholes: Check if the rear shell ground wire is connected to the host.
Weighing Instrument
Device Won't Turn On or Display is Abnormal: Check if the power is connected and if the device has power. If the issue persists, it may be due to internal component failure. Contact after-sales service.
Inaccurate Weighing Results: First, check if the device is calibrated and if there is any interference in the surrounding environment. Try re-measuring or recalibrating the device. If the issue persists, the device's sensor may be damaged and require repair.
Device Connection Issues: Ensure the cables connecting the device to the computer or network are normal and try reconnecting. If the problem persists, the device port may be faulty and require repair or replacement.
Software Operation Issues: Familiarize yourself with the device's software interface and functions by following the operation manual. If problems arise, consult the manual or seek online technical support.
Daily Maintenance and Usage Precautions
1.At the end of each day, clean and organize the bin device, weighing device, and discharge port. If the machine will not be used for an extended period, clean the feeding device, weighing device, and discharge port to prevent powder from sticking to the instrument.
2.Ensure the installation is stable and free from vibrations.
3.Various parameters in the instrument directly affect its normal operation. Unauthorized personnel should not modify them.
4.If faults cannot be resolved during use, contact the manufacturer promptly.
Industrial Hose Printer
Device Won't Start or Print Quality is Poor: Check if the power is on, if the ink cartridge has ink, and if the print head is clean. If the issue persists, it may be due to internal component failure. Contact after-sales service.
Inaccurate or Blurry Printing Position: Ensure the device's positioning mechanism is correctly adjusted, and check the position and pressure of the print head. Also, ensure the printing material meets the device's requirements.
Device Operation Interface Issues: Familiarize yourself with the device's operation interface and functions by following the operation manual. If problems arise, consult the manual or seek online technical support.
Printer Operation Precautions
1.First, select the printing wheel. The text on the printing wheel must match the manufacturing list.
2.Determine if ink is needed (special ink cartridges are required for printing white or black). After pouring ink, stop when the ink level is about 4 cm from the edge of the ink tank. Then, add 100g of solvent and place it on the printing frame. Turn on the power at the bottom of the guide wheel to mix the ink and solvent evenly.
3.Install the required printing wheel, tighten the nut, and adjust the scraper so that the printing wheel runs without ink streaks. Secure the scraper clamp.
4.Select the appropriate pressure wheel to ensure the printing wheel is centered on the wire during printing.
5.Turn on the startup switch.
6.When the printer is operating normally, add solvent every 20 minutes (5g–10g) and mix well.
7.Record the time and amount of solvent added in the control sheet.